Among many of the same resolutions for every year, I am also making a HUGE goal for myself! Resolutions are on the backburner for now. It always consists of me losing weight, and although I know I need to and I will... eventually... I want to do something that I LOVE! Because we all know I don't LOVE to workout. :)
So my goal is starting a new blog and being the crafty person that is hiding inside of me. I want to be a well known blogger, a well known crafter, well in the blog/craft world at least. I don't ask for much. I really have the want and the drive for it. So come January 1, 2011 I will be going full force on this and I will be moving to a new blog, I've created "CRAFTIFIED!". If you go to the link, you can see it is in the VERYYY beginning stages. I hope to have it all done ASAP! I want everyone to be able to send me their craft ideas, I'll be having giveaways, sponsors, highlights, guest posts, and I showing all my ideas and well... the possibilities are endless!
Crafting can mean soooo many things so I'm including them all, sewing, scrapbooking, stamping, art, and anything else you can think of. I'm open to ideas!
So PLEASE join me (in my non-begging voice)! Help me complete my goal for 2011! I am thinking positive and I hope it's a wonderful year for everyone!
Happy Crafting to you all, and happy holidays! See you in 2011!
28 December 2010
08 December 2010
A Happy Little Present.....
Today is our "Company Lunch" and we do a gift giving/taking game... I figured I would MAKE my gift this year! I can't even remember what I gave last year so anyway I think it came out great, so great that I almost wanted to just keep it and give them a gift card! :) Just saying.....
Okay so I started out with more supplies than I needed, or that I ended up using. I always get so excited going into the Dollar Tree and I have all these great intentions and then it goes out the window. So total cost for this was actually $2!!! I started with this....


Ok, so above is the wreath alone, she is the star of the show, she's a beauty! Orrrr not yet anyway...She needs a major face lift!

OH and by the way... I'm soooo not good at tutorials like this, while uploading pictures I realized that I forgot to take pictures of several steps, bear with me and imagine... :) Above you can see more of the unused embellishments, I will use them later in cards and other decorations I'm guessing. So anyhow, I used the wide ribbon to cover the entire wreath, I just tacked it down from time to time with some hot glue in the back, make sure you pull the ribbon tight to keep it from "bubbling" in places you don't want.

Here is the finished white ribbon wrap. Not too shabby eh?

Apparently it doesn't lay flat but I won't worry since it wasn't meant to lay flat in the first place :) By the way.. this is where I start missing steps.

So start imagining.... imagine that that little red flower is NOT there and I'm still showing you that I'm wrapping the narrow red ribbon over the now covered white wreath. Ok. Got it? It's really simple, just wrap the red ribbon, tacking every now and again and ta-da!

Ok, now time for the "flower" which I feel horribly about because I saw this flower being made on a blog somewhere and I don't remember where, and since I blog hop ALLLLL the time I lost track of it somewhere, so if it's your idea, let me know and I'll link you up! :) So I started out with fabric circles like above....

Imagine me folding this circle in half, tacking it together with hot glue, and then in half again, and more tacking with the hot glue. After doing that with about 3 circles, I glued them all together at the tips to creat a "flower/pom-pom" effect that I thought looked nice. I used a total of 3 circles for each flower, so a total of 12 circles, I used the inside circles of a masking take roll to trace out the circles. I hot glued them all to the wreath to make a full little bunch.

Ok, so remember that frame I told you about at the beginning... yeah that one, the white plain one... I figured it needed jazzzzzing up. So I cut out some of the same fabric I used for the flowers and I covered the frame, not completely though, the fabric hangs over the top edges so you can still see the white sides of the frame. It's all about imagination here... Maybe I should rename this blog to Imagination Station???

So anyway, I got this "Happy Holidays" tag from my Cosmo papers, I just cut it out and put it on some white card stock that would fit in the frame.. ta-da. I got these little sparkly embelishments a while back, so I don't know the brand or where I got them from. So the silver ones I put on the frame and the red ones you can see I added to the wreath itself.

I added white ribbon to the back of the frame and hot glued the ribbon to the back of the wreath, then added red ribbon to the top of the wreath so the recipient can hang it :)

So there it is! It didn't take long and I love it! And most of all it only cost me $2 so I'm happy! :) I hope they like it!
29 November 2010
I made a Christmas Countdown!!!
Yeah you read that right. I MADE.... Yes... craftiness has happened in my household this weekend. I am proud... :) You should be too!
Ok, so I googled to the ends of the Earth looking for a Christmas Countdown I liked, something I could replicate without paying an arm and a leg. This was my solution.

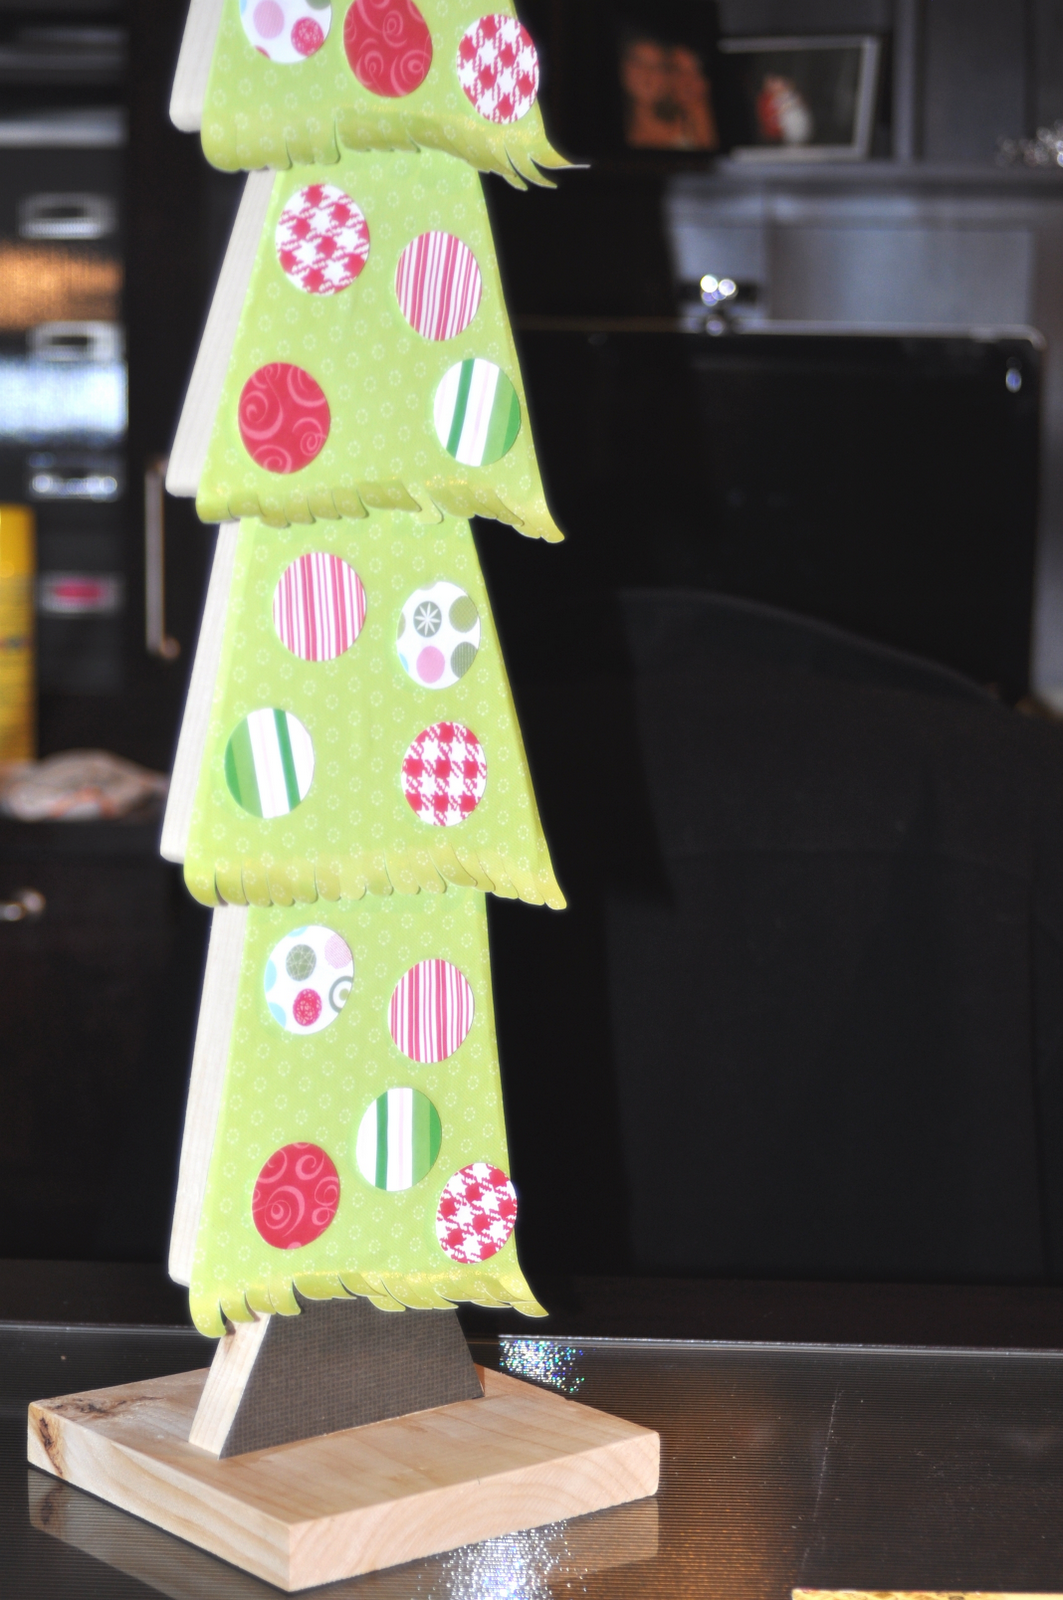
I found this wooden tree at Hobby Lobby of course, it was on sale, half price so all I paid for it was $5.00! It's about 3 feet tall and has a bunch of holes in it. I'm not sure what it was originally meant for but I made it to be something else.

Ok, so I picked out some green paper and traced each section of the tree, cut it out, at the bottom of each I added about an extra inch for overhang on each section.

I made little fringe cuts (the extra 1 inch) across the bottom of each section.

I curled the bottoms of the fringe up with a pencil so it was more 3 dimensional :)

I applied Mod Podge to the wood, then to the back of each paper section, put the paper on the wood and applied more Mod Podge over the top of the paper to make it glossy and hard.

This is a good view of the tree fringe and the progress!

You can see how the gloss makes it look so much better!

I used my Cricut to cut out 25 white 1 and a quarter inch circles, I also picked 5 patterned papers and cut 5 of circles of each paper in the same size. White circles will have the countdown numbers, patterned papers will act as the tree ornaments!

These are the itty bitty numbers I cut with the Cricut, size was 3/4 inch.

I got out my red inkpad and rolled the white circles in the pad to make a red edge to pop out!

I Mod Podged the itty bitty numbers to the white circles, I had to use tweezers to get these on without messing them up and tearing them to shreds!

Tree covered, numbers done, I glued magnets to the back of the "ornament" circles. These magnets have one sticky side to them, the sticky side will go on the tree.

All complete and ready to go on the tree!

All the ornaments stuck to the tree.

A closer look of the ornaments. They look so cute!
Closer again, you can see the paper on the trunk too!

I also added magnets to the numbered circles. I put them over the ornaments that way we can take each number down as the day passes, each number will turn to an ornament and by the time we get to the Christmas the tree is fully decorated!

You get the idea! I hope!

The completely numbered Tree!

You like the present? It has a purpose.. really... it does!

I also made this little "present" to go with it. I made it big enough to fit the numbers in, so when the girls take down a number they put it in the present for safe keeping!

Here is my complete tree standing next to my Santa! I love it!
This really came out wayyyyy better than I expected and I LOVE it. I started this not really knowing how it would look or how I would do the countdown. I first wanted to make little doors but that was a little crazy. Then I wanted to use the hole it originally had but figured it would look messy.... So this is what I ended up with and I'm so glad! We will use this for many years to come! :)
17 November 2010
Northern New Mexico....
... is where I'm from and I love it, small town, and beautiful views. By beautiful I mean BEEEE-UUUUTEEEFULL! Like this.....


I took these pictures on my last trip "home".... I miss the quiet days, quiet nights and no worries.... Ahhh to be 17 again!
28 October 2010
Is that something crafty??? Why Yes! Yes it is!
Can you believe it!?! I almost can't but I was literally forced to do something crafty! Ok, maybe not forced but I did something and I like it. I think it needed an extra oomph but the recipient of said craft is not too into pink and shiny stuff so I hit a brick wall while designing this.
 It's just a little name plate that she can put up in her new cubicle and apparently she likes skulls and crossbones. So This is what I came up with, simple yet so totally Barb! By the way, I totally freehanded and cut out this skull and crossbones myself. Toot Toot! I found the picture online, I drew it on black paper with a pencil and cut it out with my Xacto Knife. I highlighted all the areas that needed it with my white craft pen and VOILA! The big "B" is from Cosmo Cricket Letters and the "arb" I cut out with my Cricut. The little board was actually something that I won a long time ago and was just sitting in my office collecting dust and waiting to be refurbished. I'm sure it's happy now.
So in other news, I've been in a Blog Hopping mood. I've been to the ends of the internets and back and I have found some amazing, creative, fun blogs that I'd like to share with you. So click it up and check out these gals!
Sew Much Ado
Eighteen25
Crap I've Made
The Creative Crate
A Girl And A Glue Gun
I'll be back to show you some other creativity going on in my house! Sooooo excited!
26 October 2010
Orange and black and more ORANGE!
It's Halloween time again! I pretty much failed on the decorations department this year. I think it just creeped up on me and I lost track of time and I'm SUPER busy so not many decorations at all! One thing that we ALWAYS do though, is pumpkin carving. This was our go at it!
 No guts no glory..... she took those guts out and enjoyed it!
 Alex is becoming a perfectionist, she loves to draw and her design is awesome as always!
 Although Mikayla loves everything creepy she stuck to the kinder, gentler theme of Halloween for her pumpkin this year, a wizard!
 They all concentrated hard, figured out their design and go to work! It's always fun to see what they come up with. I love it.
 Nevaeh had fun like always. I still have to do my pumpkin so I did some googling today to get some ideas and I think I'm ready to start... now to find the time!
 25 October 2010
The treeeee... at last!
It's been a long time coming, but can you believe.... I finally took pictures and uploaded them of the "tree" on my daughter's wall? It only took a few months but here it is finally! To jog your memory, this was the inspiration:
 I knew that I wanted something similar and by no means was I going to buy a decal to put up because I figured I could do it myself. :) So this is what I came up with... and my daughter loves it, so that's all that matters.
 It's not nearly as full but I really didn't want to "clutter" the space too much. I mostly just wanted the effect, which I got and I'm happy with.
 As you can see, it goes all the way to the baseboards but you can't really tell because it's partially hidden with the nightstand, which is okay because I thought I was a bit dull anyway.
 This is a bit more up close. You can see a little more details to the flowers. The tree trunk and branches were all hand painted on with regular wall paint. The flowers were a bit more tricky. I cut out the flowers with my cricut and rolled the edges with a pencil to make them 3 dimensional.
 The center of the flowers are the flat sided marbles, I really don't even know the purpose of those other than I've seen people make magnets out of them and I've seen them in goldfish bowls. Who knows?!?
 I spread out the flowers throughout the wall and slightly onto the next wall, to give the effect that they are being blown off the branches. My daughter loves this!
 Here you can really see the 3-D look of it. Everything was hot glued onto the wall and I love it. I don't think we'll be redecorating this room soon so it's there to stay for a while! :)
I'll be back to show you the next ongoing project in my house soon! All to save a few bucks!
Subscribe to:
Posts (Atom)